|
Quick, easy, and full of flavor, this hummus recipe is great as a snack or part of a meal. If you, or those in your immediate vicinity, don't devour this right away, it should last up to 4 or 5 days in the fridge. It's healthy and really simple to make, so enjoy!
0 Comments
Some of you know I'm not one to rely on shakes for anything. I prefer to eat my nutrients as opposed to drinking them. Especially these days with all the other chemicals and unnecessaries (yes, I just made that word up) they put in powders these days. That stuff is actually toxic and will work against you in the long run despite the immediate effect it may have.
I've always been about doing things as natural as possible (of course, arsenic is natural, but you know what I mean). So, after many different combinations of ingredients, I've come up with a way to make a shake that has good-for-you stuff in it and that tastes like a chocolate-almond shake (no joke!)! I will usually have one or two of these a week and usually only after a great pump where my muscles are in need of repair (I'll add the whey to it). You can easily have this for breakfast if you're in a rush and omit the powder; it will still taste pretty much the same and grant you some lasting energy (unlike that donut or bagel). The Vital Proteins are simply cow collagen (flavorless) and contain a decent amount of arginine to improve blood flow before you exercise and the whey is just whey and nothing else. So, let those other people keep their $4 a scoop powders loaded with artificial sweeteners and other things you can't spell even while looking directly at them; you know better and now you have this! Super simple and healthy soup for a cold and rainy day like today. I basically made this one up on the spot seeing how I had two giant leeks in my fridge that had about a day left before hitting the circular file. But, it came out creamy and delicious without added cream or butter! 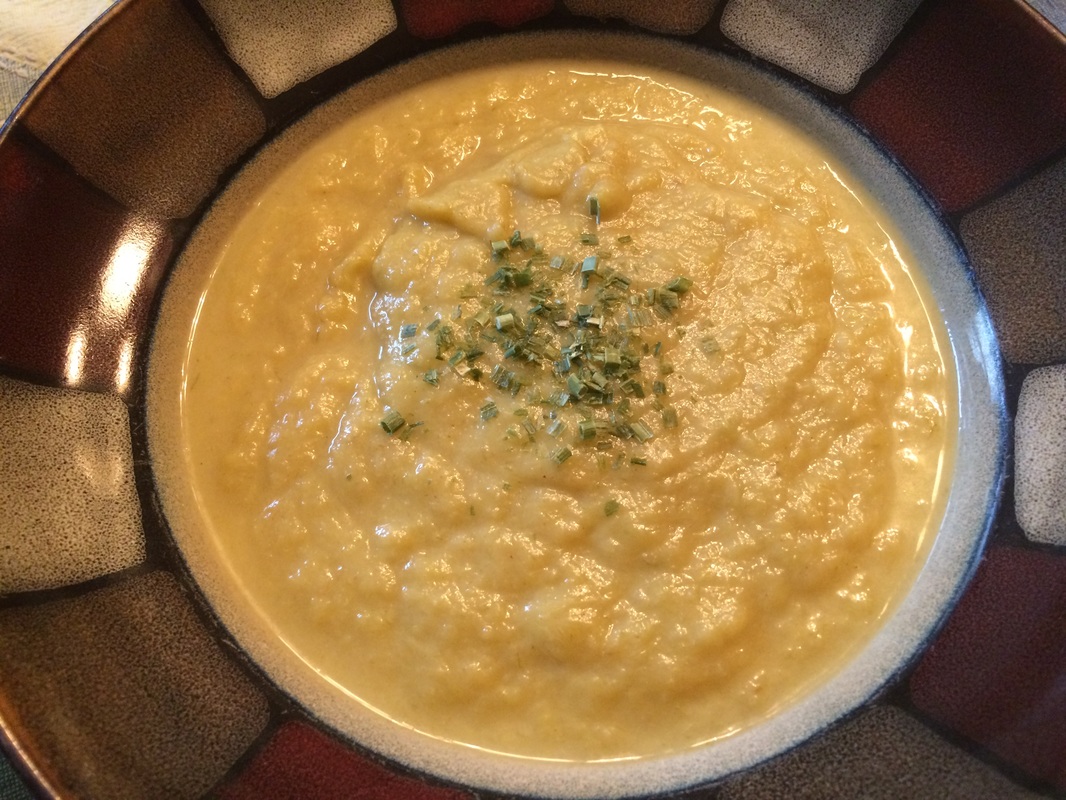 Ingredients:
Method: Set a rack in your oven to just below center and set the oven to 350 degrees F. Cut and wash the leeks and cauliflower and place in a roasting pan. Add the oil, a few pinches of sea salt, and black pepper to the veggies and stir. Wrap the garlic (with skins on) in a piece of aluminum foil with a little oil and close the foil around the cloves. Place the roasting pan and the garlic next to each other on the rack and roast for 30-40 minutes stirring the veggies every 5 minutes to avoid burning. When veggies are slightly golden, remove them and the garlic from the oven and discard any pieces of leek that may have burned too much (I had about five pieces). 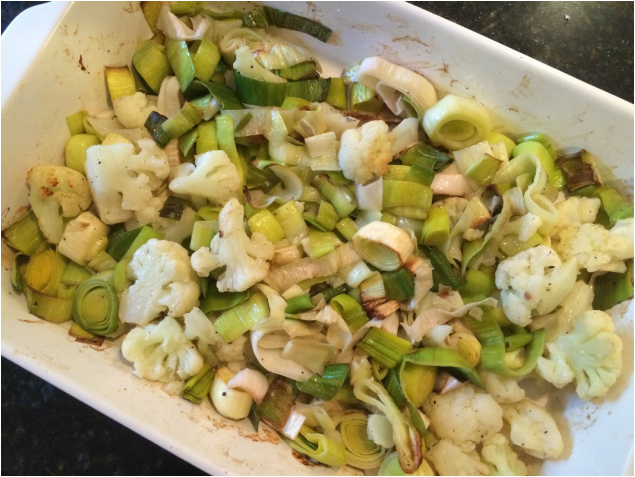 Put the veggies into a dutch oven on the stove and add the chicken stock, bay leaves, and a touch more sea salt (just be careful not to add too much at this point as you will add more later for a layering/depth effect) and bring to a light boil. Squeeze the now roasted garlic paste from the skins and add to the pot. Reduce to a simmer and cover for 20 minutes, stirring occasionally.
Remove the bay leaves and, using an immersion blender, blend the soup until smooth. You could do this in batches in a blender if you don't have an immersion blender. Test for saltiness before adding any more salt. Add freshly grated nutmeg, sea salt, and white pepper and stir to distribute. Serve immediately with chopped chives to garnish. This is a recipe I created for a cooking demonstration I did yesterday. You don't have to use nori if you don't like seaweed as you can substitute lettuce, rice wraps, or whatever you like as long as it's relatively healthy. I give no measurements other than the condiment mixture as the contents in your wrap can really be whatever you want. Just make sure you get some fat in there (in this case, the avocado) because there are a lot of fat soluble vitamins in there that your body won't absorb without it. 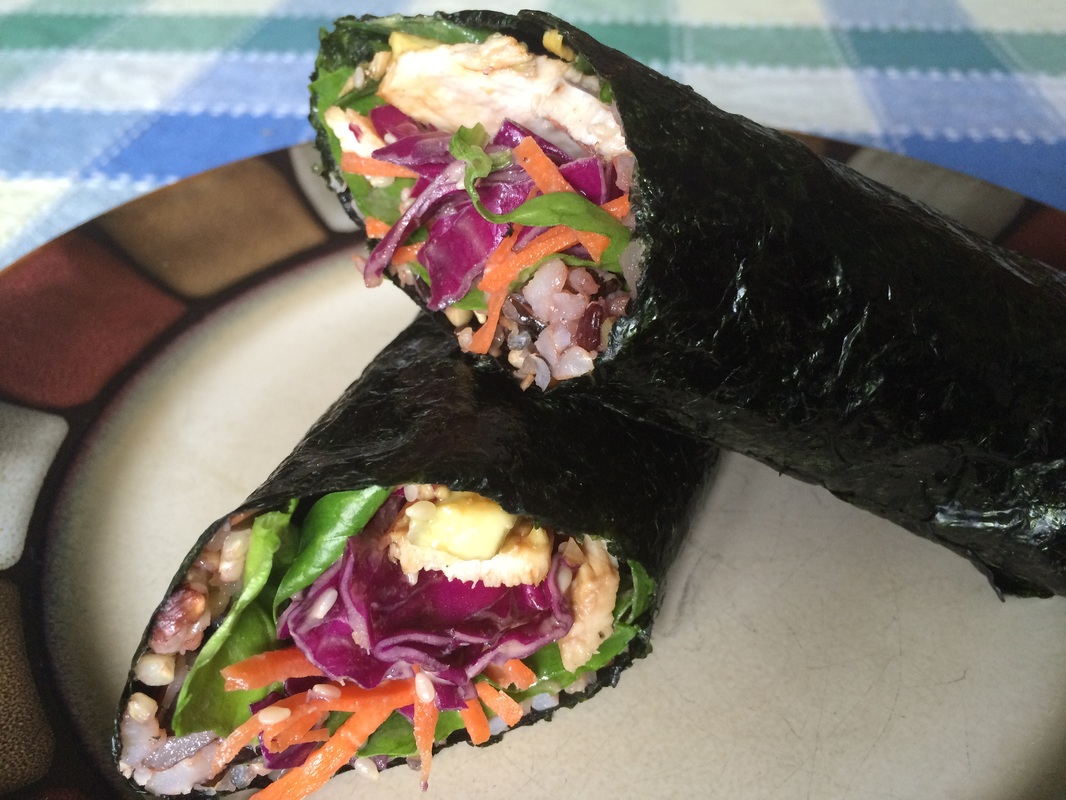 Ingredients:
Method: Start by cooking the rice as instructed on the package and letting it cool. Grill the chicken on a grill or cast iron grill pan with a little salt and pepper and let that cool before slicing it. Continue by toasting the sesame seeds in a skillet over medium high heat. Turn them quickly to avoid burning the seeds. Remove them from the skillet onto a plate and let them cool. While they cool, mix the coconut nectar aminos into the dijon mustard until smooth. By the way, coconut aminos is fantastic and a great alternative to soy sauce or even liquid aminos because it has way less sodium (you don't even miss it) and 17 amino acids! Add the sesame seeds to the mixture and set aside. Shred the carrots and cabbage into a bowl and toss with the aminos/dijon mixture. Cut the scallions on the bias to about 1/8 inch slices (use the greener section and reserve the whiter section for another recipe) and set aside. 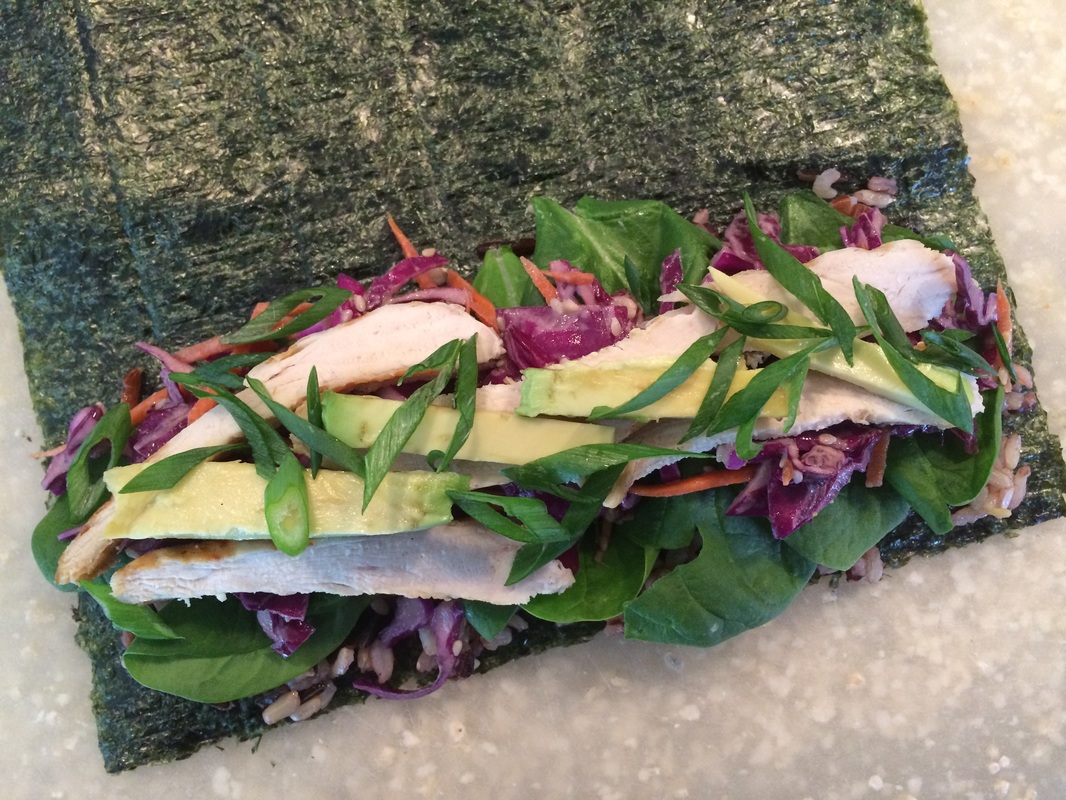 Place a sheet of nori on a cutting board and line the first third with rice. Top the rice with a layer of spinach, followed by the carrots and cabbage. Next, top that with a few strips of chicken and avocado then sprinkle on the scallions. Carefully roll the nori from the end with all the ingredients to form as tight of a roll as possible (it's easier if you use a sushi mat, but it's not necessary) until about an inch of nori remains to be rolled. Brush a little water along the inside edge and finish rolling the nori, holding it for a moment to seal the wrap against itself. Slice the roll in the center on the bias. The great thing about all this prep (I know it seems like a lot) is that, if you prepare enough of each ingredient, you'll have leftovers for days. It will only take minutes to assemble another roll for a nutritious snack or meal at home or on the go. I'm actually eating one as I post this :-) 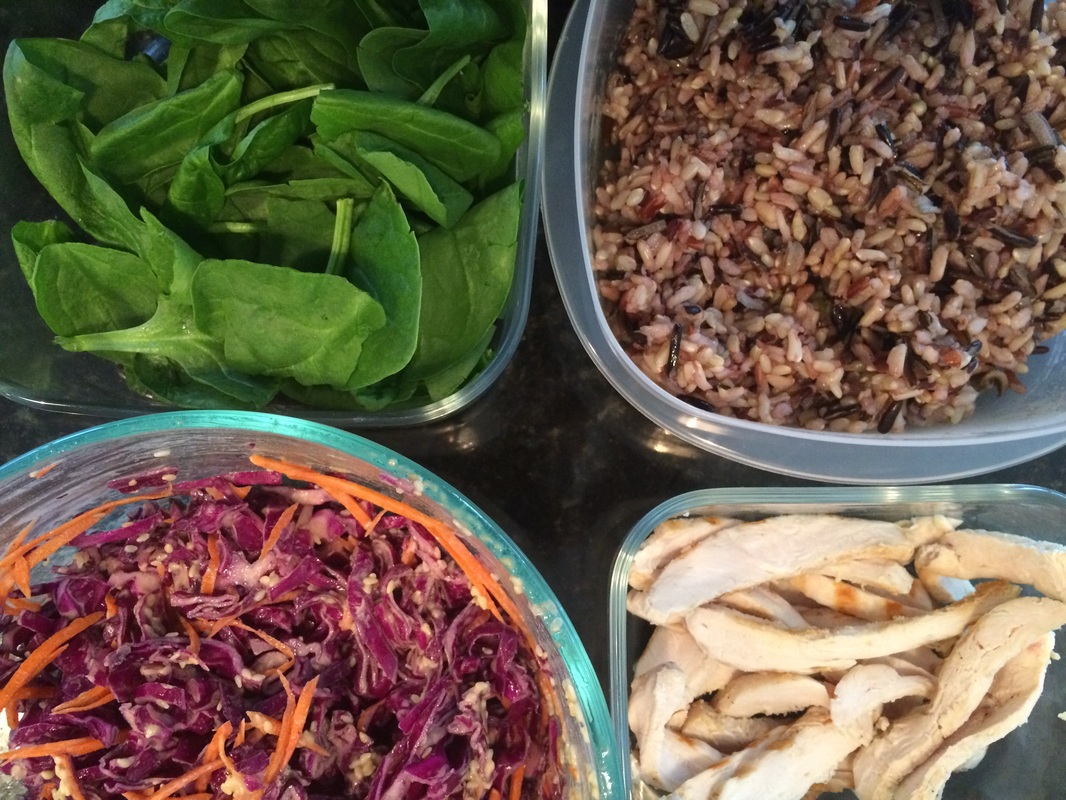 Don't worry, this isn't that stuff you used to eat as a poor sophomore in college. You know, the stuff that shot your heart rate through the roof and had you puckering like a fish. No, this is my approximation of actual Ramen soup. I even made a special trip out for the Kombu. 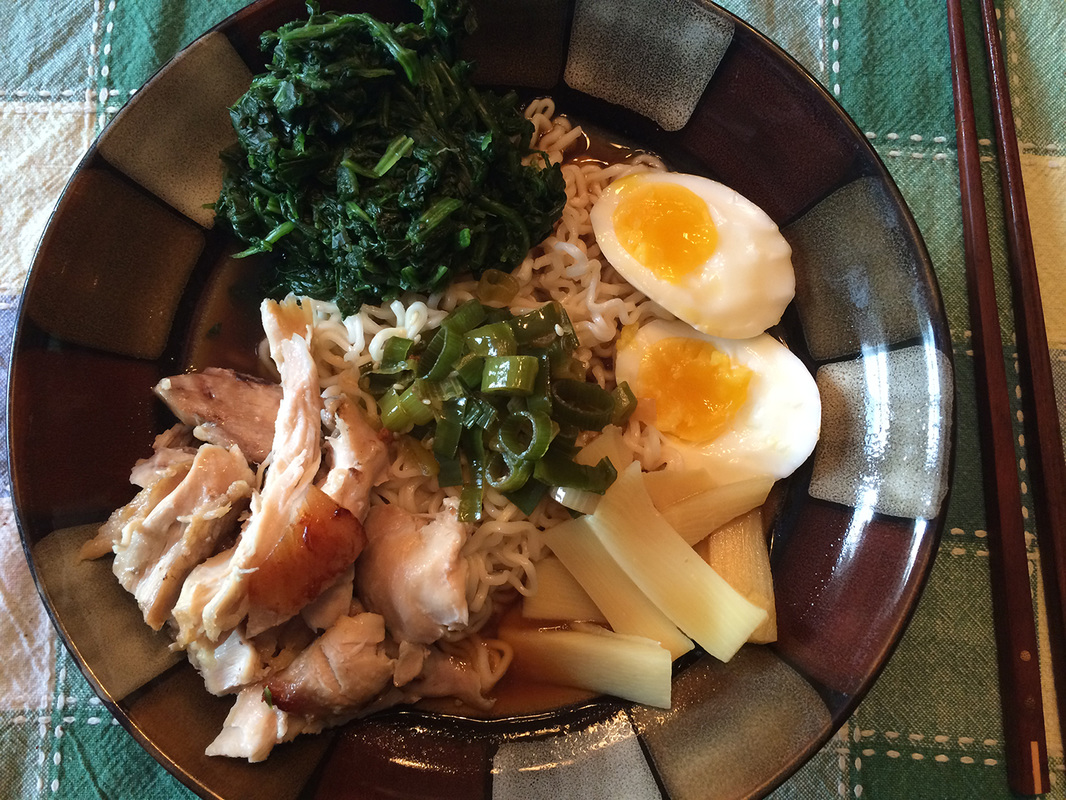 I created this recipe simply because I love soup. A deeply flavored, hearty soup from any nation is enough to cleanse the soul and make you feel right at home. This soup lends itself to many topping options and, while it may not be the healthiest thing I can present, it's really not that bad since you can control the sodium and fat content yourself. It's most definitely healthier than the quick-cook and canned selections we have available at the grocery store. When I began this project, I looked at soup recipes from all over. Some were quick and dirty while others took hours upon hours to make. I settled on creating something that landed me in the middle time-wise. In this way, I retained some of the authenticity without letting it take up real estate in the kitchen all day. Also, it wasn't so quick as to make the flavors thin and salty. The name of the game I was playing was 'Efficient but Flavorful'. To this end, I kept the four basics of the soup in tact (broth, tare, noodles, toppings). How I made each, however, I felt was up for interpretation. The biggest change I made from tradition was in the broth. While the recipe starts with par-cooking the chicken, which leads one to think I could just leave it in and make a broth, I chose not to have it sit on the stove for hours on end. Instead, I opted for plain, ready-made broth and flavored that as I saw fit. As with the last recipe, I have no nutrition info for you as the toppings can really change it up. Plus, if I'm being honest, I'm feeling lazy today. What follows sounds like a lot and if you're not much of a cook to begin with, then it is a lot. But if you stick with it, it's most definitely worth the trip. Basically, you'll be going back and forth between a pan and a pot most of the time. While one is cooking, you'll be playing with the other. While I can spend hours on a meal that usually tastes good or even great, sometimes it's just not worth all the trouble. This was worth the trouble to me. All told, this took about 2.5 hours and I was making it up as I went along using some basic info from various sources as my guide. I fed a family of 5 on this and still had several cups of broth left over for another day. Ingredients:
Toppings I used:
Method: In a large pot (I used enameled cast iron) start by par-cooking the thighs in 5 quarts of water, 1/3 Cup of mirin, and 1/3 cup of soy sauce. After about 15 minutes, remove the thighs and pat them dry with a paper towel. You're mostly removing excess water so the oil doesn't splatter on you. Dump the water mixture out (or save it if you have other broth plans for it) and return the pot to the stove. While the chicken is par-cooking, heat the sesame and grape seed oils in a pan (that has a lid) on medium-high heat. After the chicken is patted dry, transfer it skin side down onto the hot oil and cover. Flip the chicken a few times until it is cooked through. The skin should render its fat into the pan and the cover should keep any moisture created from evaporating. You need this liquid and fat for the Tare (basically, it's a liquid seasoning that you'll add to the broth to give it deep, concentrated flavor). Lightly salt the chicken on each side before the last two flips. While the chicken is cooking in the pan, boil 4 Cups of water, 4 Cups of chicken stock, and 2 Cups of beef stock in the large pot you returned to the stove. When it comes to a boil, drop in the Kombu (you can rinse and pat it dry beforehand but most are cleaned well before packaging. If you do clean it, just be careful not to rub off the white powder. That's Umami (glutamates) and it holds major flavor). Reduce the heat to just under a boil and let the Kombu steep for 30-60 minutes depending on how strong you like it (just like tea). Once the chicken is done cooking, remove it to a plate (while the Tare cooks, you can remove the skin and bones and cut up the chicken as a topping) and add the smashed garlic to the pan. Cover the pan again so as not to lose the liquid at this point. We will reduce it in a bit. Brown the garlic on all sides and then add the remaining 1/3 Cup of mirin, 1/3 cup of soy sauce, and a few drops of liquid smoke. This liquid will deglaze the pan and help you break up and dissolve any fond (tasty, brown bits in the pan). Add the chopped scallions. Leaving the pan uncovered, reduce the liquid by half adding the sesame seeds in the last minute. If you're really good at smoking meat, you could smoke the chicken instead and leave the liquid smoke out of this recipe. Remove the Kombu from the broth and pour in the Tare you just made. At this point, you should taste the broth for seasoning. The soy sauce may have added enough salt by now, but if not, you can add a bit more salt at this stage. Just do it little by little and taste it each time as you don't want to over-salt. Keep in mind, if you have salty toppings in store for plating, you probably shouldn't add any more salt at this time. Now, as the broth stays warm on the stove, you can prepare the toppings and boil the Ramen noodles. If you have fresh noodles, you can leave the heat a bit higher on the broth and cook them in there. I found the easiest way to plate this is to put the drained noodles right in the center of the bowl, arrange the toppings around the noodles, then spoon the broth over the center. The broth will continue to fill the bowl as the scallions pile up on top of the center of the noodles. And, that's it. Soup's on! Enjoy! Here's another version of toppings. The chicken thigh was seared in a pan with in rice wine vinegar and soy sauce with the skin on. The pan was covered and I flipped it every now and again. Near the end, I uncovered it to reduce the liquid and took the skin off so that the reduction would adhere to the meat. The veggies are bok choy, baby corn, bamboo shoots, and scallions. 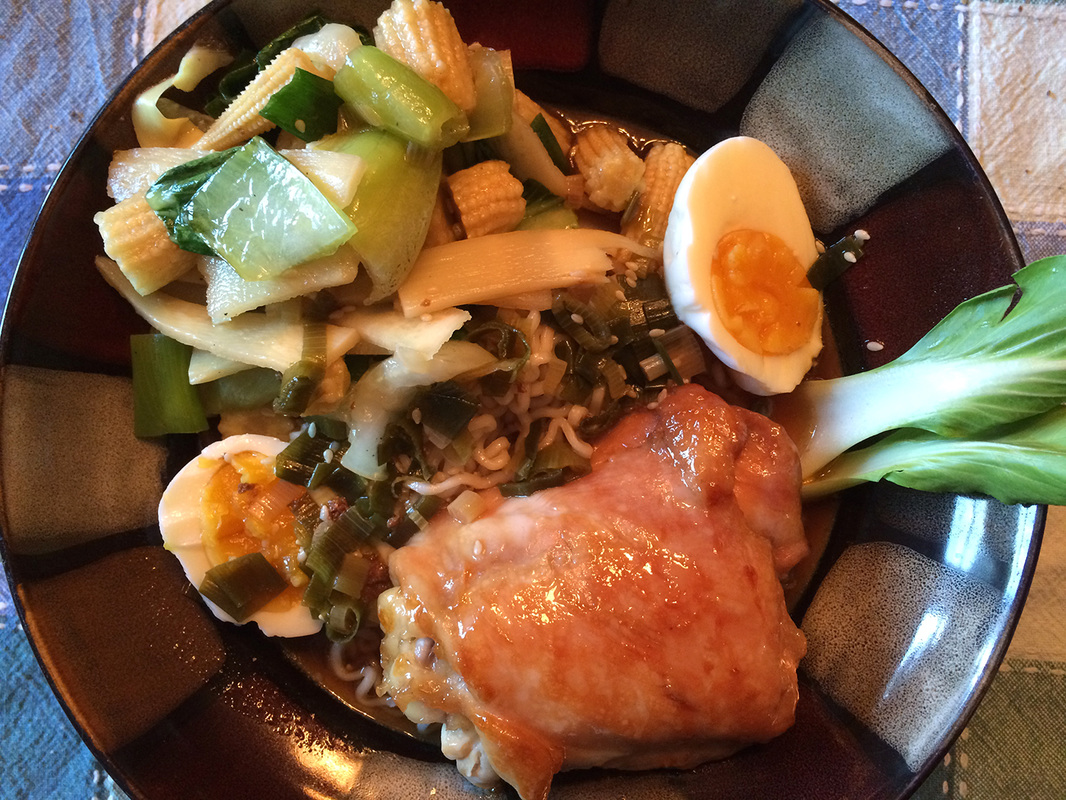 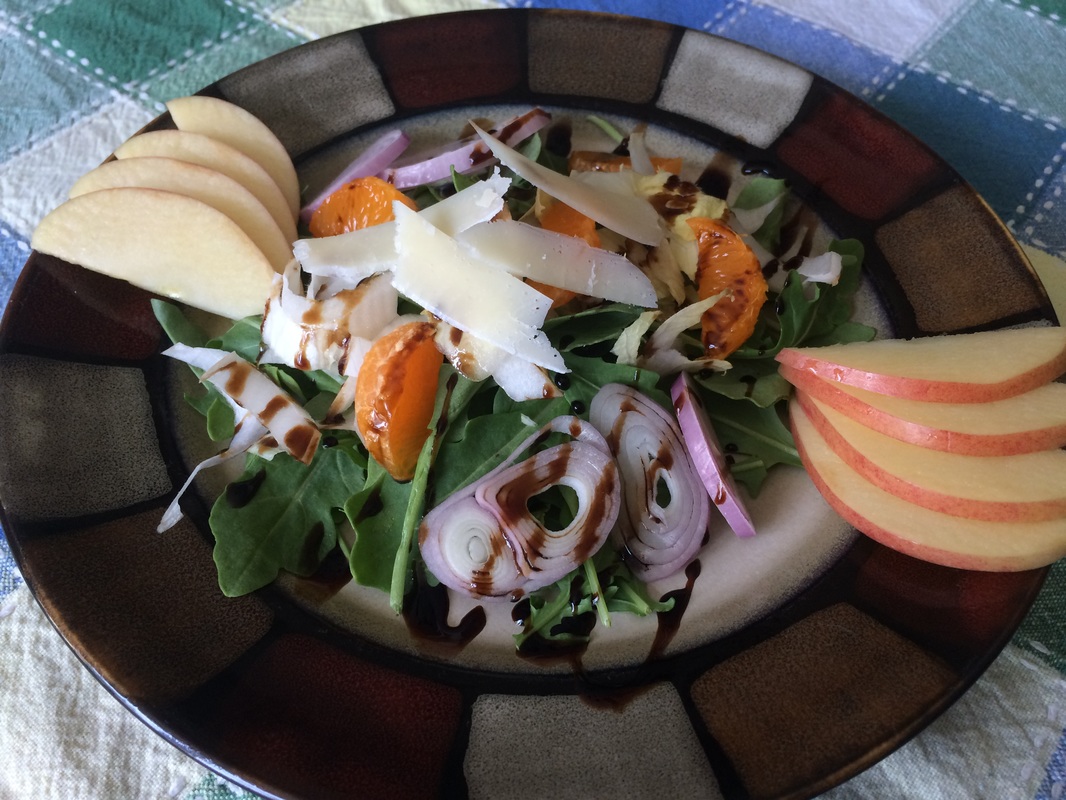 I created this salad for friends last night and it went over very well, so I thought I'd share it. I won't put the nutritional info here since you can play with the ingredients to your heart's content. The slight bitterness of the endive and shallot are offset by the sweetness of the mandarin orange and gala apple. Arugula brings that peppery taste and a few shaves of grana padano adds just the right amount of fat (yes, I said 'fat'. There's nothing wrong with dietary fat as we need it to survive. It's the sugar without fiber that you have to avoid.) If you replace the apple with a pear, you'll have even more fiber in this one.
I finished it with a drizzle of black cherry infused balsamic vinegar. After taking the picture, I hit it with a touch of lemon infused olive oil which put it over the top in the flavor department. Enjoy! Ingredients:
 Ok, that title actually has a funny meaning around our house, but I thought it was fitting nonetheless. Actually, I swore off pancakes (along with muffins, waffles, and donuts) as I believe they are just an excuse to eat cake for breakfast. That aside, there are other types of "pancake" recipies out there these days that are much better for us. For instance, my wife makes a killer butternut squash pancake. They're so good and healthy that I don't think twice about eating it. After seeing a number of bananas on our counter last night that I knew wouldn't last much more than another day, I thought I'd try to come up with a banana pancake. Today I set to work with a number of bowls, each with a measured portion of a base batter of eggs, bananas, and about half the cinnamon I ended up including in this recipe. From there, I tested...and tested...and tested. The first bowl was cooked as is, then sampled. It wasn't bad, but not how I'd want to start my day. Into the next bowl I added one new ingredient, cooked it, and tasted. I continued this calculated effort for the subsequent bowls until I was adding two or three different ingredients at a time. 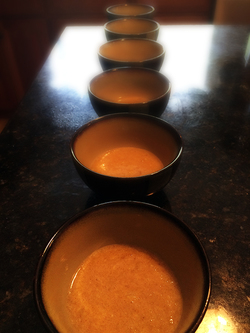 I ended up with eight total concoctions; three of which were pretty high up on the ratings scale for me with regard to taste and texture. The baking soda definitely helped with the texture and thickness. The almond butter was a great addition, they just came out a bit more dense (not in a bad way, so go for it if you think you'd like it). I also tried all coconut flour in one and all almond flour in another but found pros and cons with each, so ended up combining them to get the desired result. You can play with those amounts if you prefer a different texture or flavor. My final recipe is below, and contains the option for almond butter. These will be darker than normal pancakes, but darker color just means more flavor. Ingredients:
Optional: 3 Tbsp Almond Butter Method: Start by wisking the eggs in a large bowl. Add the bananas and mash them into the eggs with a potato masher or large fork. Once there are few to no chunks of banana, add the rest of the ingredients and wisk until combined. With a small dab of coconut oil (or many small dabs on a large skillet) on a pan preheated to a medium high temperature, pour a little less than 1/4 Cup of the mixture on top of the melted oil. Cook as you would a normal pancake. Serving suggestions: Berries, a touch of honey, a sprinkle of cinnamon, and sliced almonds. Makes about a dozen Nutrition Information: The optional almond butter will change the following information. The coconut oil will change it only a little. Serving size: 3 pancakes
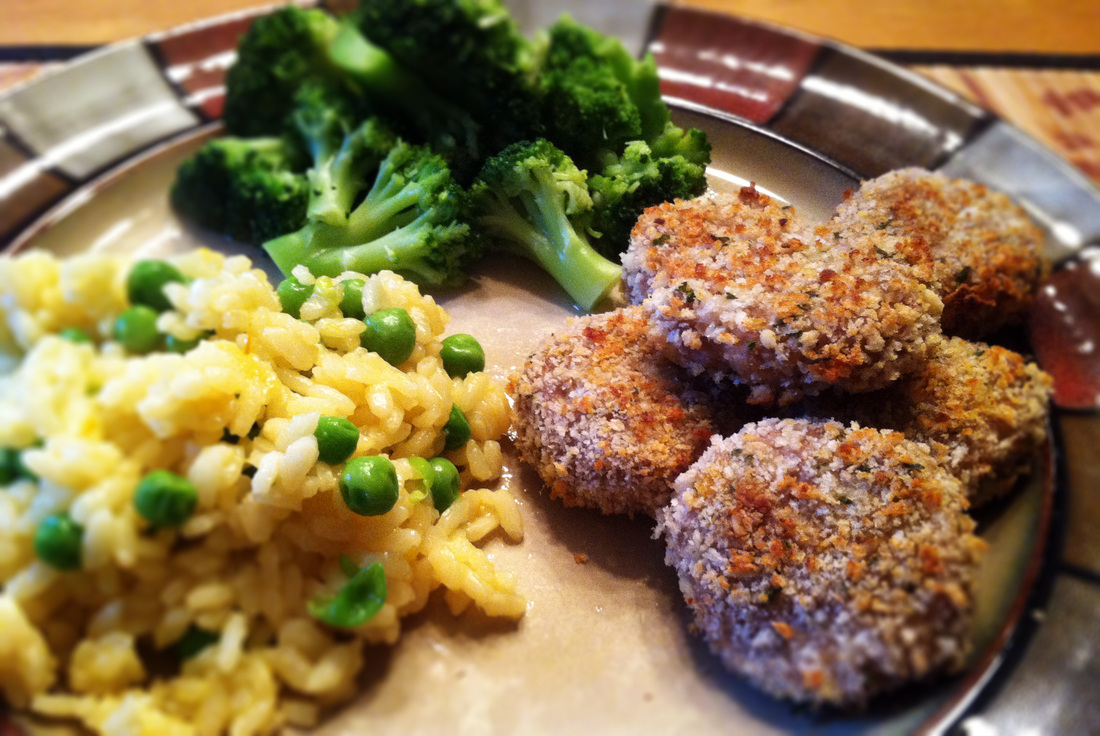 Here's one for the kiddies (and the adults who are still secretly kids). These can also be made with ground chicken and are a healthier version of that junk at the fast food restaurants. So, if your little ones are hooked on those and whine about everything else you make, serve them these as a transition to healthier eating (just don't serve with condiments that have high fructose corn syrup). I actually measured it out this time for you. Shown with saffron risotto and steamed broccoli. Ingredients:
Method: Using a food processor, pulse the oats until they become fine. Pour in about half the cheese, all the paprika, and some salt and pepper to taste (Be careful if your breadcrumbs have a lot of salt already; you may not need the extra. The cheese may be salty enough, as well). On a separate plate, mix the breadcrumbs with the remaining cheese. Pour the dry mixture from the processor into a bowl with the ground turkey and onion, and mix it with your hands until homogeneous. Roll the meat mixture into 1 and 1/2" balls (about Swedish meatball size) and press each into the breadcrumb mixture on both sides. Pressing them into the breadcrumbs as opposed to shaping them first gives the breadcrumbs better adhesion to the meat. Press each to about 1/2" thick. Spread nuggets out on a foil lined baking tray (spread a bit of grapeseed oil over the foil if you're worried about them sticking) and bake at 350 degrees F for about 8 minutes in the middle of the oven. Flip the nuggets and bake for another 7 minutes. Finally, brown the nuggets on the top shelf of the oven under the broiler for about a minute on each side (watch that they don't burn). Makes about 28 nuggets. Nutrition Information: Based on a 5 nugget serving (numbers may change based on the brands you use)
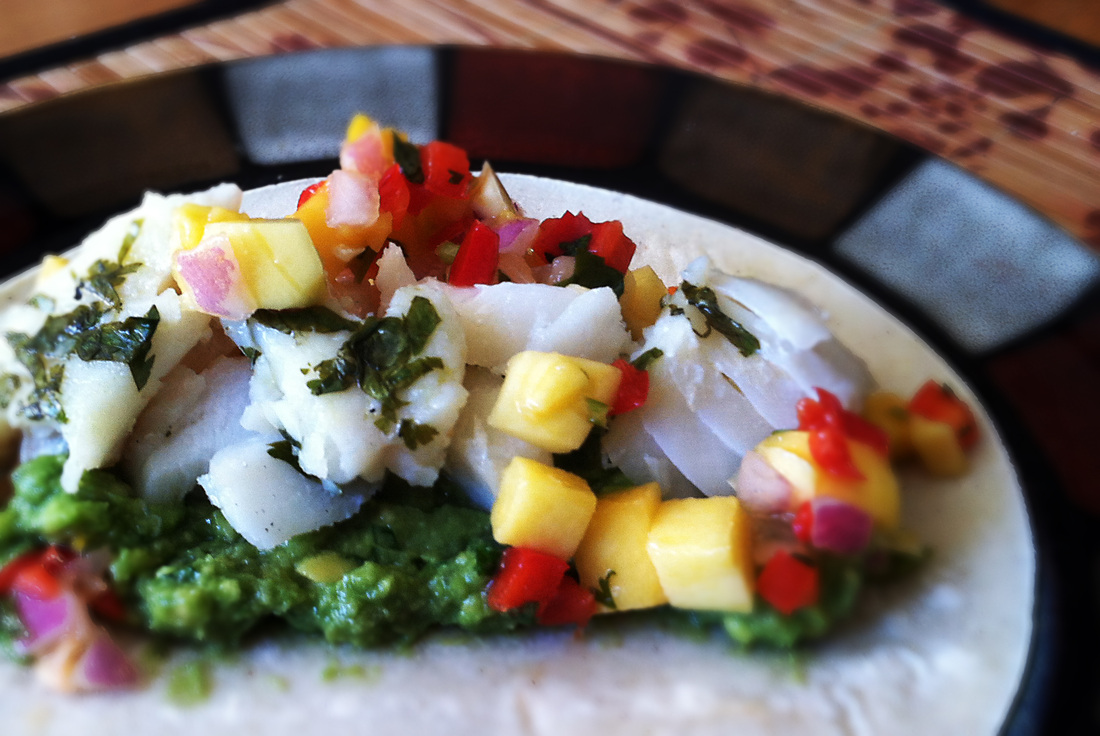 I have to apologize in advance; I don't really measure anymore when I cook. Since this is a new recipe, you won't be getting much measurement guidance. I know that's a pain, but it's the Italian side of me saying, "Do what you think tastes and looks good." Ingredients:
Method: Set the broiler of your oven to high and heat a cast iron skillet on your stove. Pour a small amount of grapeseed oil into the skillet. As soon as the oil heats up (it will be fast), carefully lay the fish scale side down in the skillet. Salt and pepper the upper side and sear for about a minute. Next, put the pan on the top grate of your oven so that it's about 4-6 inches away from the element. While the fish is under the broiler, mix the juice of one lime with chopped cilantro and a small amount of avocado oil. When the fish is one minute from finished (you'll see it pulling apart; flaking), slide the skillet out for a moment and brush on the cilantro/lime/oil mixture. Finish cooking the fish under the broiler for about a minute. Spoon the fish into a bowl (If it's cooked right, it will flake apart by the simple act of moving it from pan to bowl) and serve family-style with the tortillas, guacamole, and salsa. Nutrition Information: *Half the total fat and almost all of the saturated fat is from the avocado. Halve or omit if desired. Also, if you are cooking for yourself, you may find a full filet to be too much to eat all at once, so you can reduce these numbers further by halving the fish or just save half for lunch the next day. Cod is high in protein, so be careful. Remember, excess amounts of any macronutrient--including protein, will be stored as fat. So, don't eat this and then have a protein shake if you're trying to lose weight. Based on these 3 ingredients and the oils (mango salsa, salt, pepper, and cilantro not included): 1 Cod fillet (231 g) 2 Tortillas 1 Half Avocado
|
AuthorMike Laiuppa Archives
February 2017
Categories |
 RSS Feed